Hungry Guy Stories
How I Built My Toilet Slave Bed: Head Section
|
|
Hungry Guy Stories How I Built My Toilet Slave Bed: Head Section |
Becsause ASSTR has bandwidth problems during peak periods, it doesn't display the images during these times. If that happens, please return again some other time to see the plans and diagrams.
Also, I just discovered that Firefox does not display the text on this page. I don't know why. You'll have to use Internet Exploder to see this page.
I built my toilet slave bed in sections so that it will fit into trunks for shipment.
I will describe how to build each section separately.
Please read these directions from start to finish to familiarize yourself with the steps before you begin construction.
The toilet seat / head box is, by far, the most complex, so once you build it, the rest will be easy.
You will need the following tools:
You will need the following materials:
Start with one of the sheets of plywood and mark it as in this diagram. Each blue square of the grid represents 1 inch. The large black square is the sheet of plywood that is 24-inches by 48-inches. Be sure to mark the part letters on each piece, too.
Take another sheet of plywood and cut it into pieces according to the following diagram. Mark the part letters on the rougher surface of the wood, because that's the surface that will be facing INSIDE.
Any leftover pieces that are not identified by a letter are scrap that you may save and use for later steps.
When you are done cutting wood, you should have the following pieces:
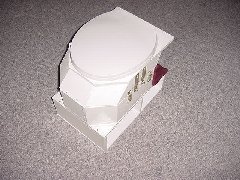
As you assemble the parts, please refer to the photograph at the top of this page frequently to make sure that what you are building is working its way toward that objective.
From here down, I don't need to give measurements. That's because, if you cut the parts accurately, everything will just fit together like a jigsaw puzzle.
Now, take parts A, C, D, E, S, and T.
Assemble them according to the following diagram:
While the part letters are shown here, you will be facing the letters inside so that they won't show. Ink will bleed through the paint eventually.
You should get something that looks like this, which is to become the base of the toilet seat box.
Make sure they fit togther as shown before gluing them together.
If they do, then glue them together.
Wait for the glue to harden overnight, then screw them together as shown below:
VERY IMPORTANT: Don't just screw the screws into the wood, as that will split the wood. You need to drill pilot holes first with the power drill, using a bit just slightly smaller than the screw, then screw the screws into the holes.
REMEMBER: The head box seat must support your weight and will endure a lot of stress during its use. Plus, it has to endure the abuse of travel insise a trunk (for me anyway). That's why it needs to be glued AND screwed securely.

Now set the base aside and begin the middle part where the slave's head will go inside.
Now, take parts B, F, G, H, I, U, and V.
Assemble them according to the following diagram:
You should get something that looks like this, which is to become the bottom half of the box in which the slave's head goes inside:
Notice that panels V and U are positioned on an angle. Because of that, you may have to saw the ends at an angle to make them fit good. Or you can fill the seam with wood putty. Your choice.
After you have the pieces cut perfectly, glue them together liek you did before.
Again, wait for the glue to harden overnight, then screw them together as shown below:
Now, take the two parts you just built, and glue them together like this:
One again, after the glue dries overnight, screw the parts together like this:
The reason for the following steps is because, to be comfortable, a person's head must rest on a surface that is several inches above the surface that the body rests on. So we need to raise the surface inside the head box.
Now, take part Q and glue and screw it in place as follows:
Now, take part R and screw the shower drain into the hole to guarantee that it fits, like this:
It should fit in easily but the rubber gasket should contact the wood all around the edge of the circle.
Now, with the drain in place, glue and screw part R over part Q:
Now, take part W and glue the foam padding on top of it like this:
Now glue part W in place so that the foam is centered under the toilet seat (where your slave's head will rest).
Now, take three (3) parts Z.
Their purpose is to serve as strengtheners for the angled panels.
Position one part Z at each of the inside bottom of parts I, U, and V as shown in this close-up:
Set this thing aside for now.
This next part is the most difficult to build!
That's because measurements not only need to be customized for the supplies that you bought (which is why I can't give actual measurements here), but they must be very precise! On top of that, there are many pieces that must be fit together at odd angles.
Ready?
Take part J, and then take out a brand new toilet seat.
Set part J flat on the floor and position the toilet seat on it as shown.
Ensure that the front edge of the seat is flush with the front edge of the wood. Also, ensure that the seat is centered between the sides.
Now, take a pen and mark where the mounting holes for the toilet seat at the rear of the wood. And draw an outline of the INSIDE hole of the toilet seat onto the wood. Make sure the seat doesn't move while you do this!
Remove the toilet seat.
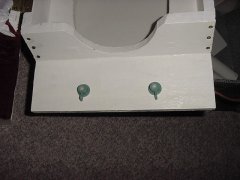
Part J should have markings on it that look like this:
Drill the two holes where marked, slighty larger than the plastic bolts so that they will go through the wood freely.
Then cut out the opening that corresponds to the hole in the toilet seat.
Part J should now look something like this:
I'm going to take smaller steps next because the way that the parts fit together is intricate and hard to describe to put them all together in one single diagram.
Take parts J, N, and O.
Glue them together according to the following diagram:
Now, take parts J, K, L, M, and P.
Glue them according to the following diagram:
You should get something that looks like this, which is to become the top half of the toilet head box:
Now take three (3) parts Z, and glue and screw them to the seams of parts O and J. Then take three more parts Z and glue and screw them to the seams of parts N and J.
For the next step, you'll be painting it. Regular glossy paint won't stick to bare wood, so you need to paint it with a special type of paint called wood primer paint, which is usually flat white. When that dries overnight, pait it again with glossy white paint for that "toilet bowl" look :-)
When the paint has dried, it's time to start mounting the hardware and do the final assembly.
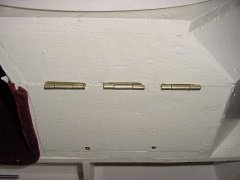
Attach part N of the top half to those same three hinges as shown in these photos:

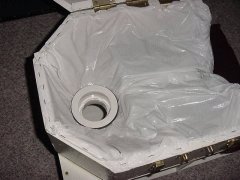
Now, unscrew the shower drain, and staple a plastic garbage liner to the rim of the head box. Poke a hole in the bag over the drain hole in the wood, then replace the shower drain as shown:
Next, mount the toilet seat permanently, just as you would install it onto a regular toilet.
Use a hacksaw to cut the excess length off the plastic bolts that hold the seat to the toilet, or they will poke your slave in the chest.
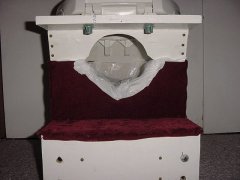
Next, cut a square of the Vellux blanket about 13" by 15" and staple it to the back of the box as shown here:
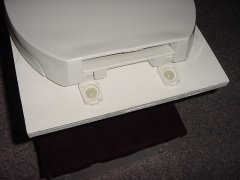
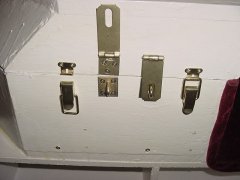
Next, mount two clips and/or two padlock claps as shown:
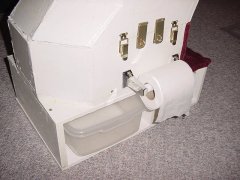
Place one of the Tupperware bins in the slot under the head box to catch any spills.
And, if you choose to, you can also mount a toilet paper dispenser as shown here:
If you are the Dominant, right about now, your slave should be looking very, very frightened.
The head box is complete!
| < |